A Topcoat Will Make Your
Picture Frame Shine
Applying the topcoat is our next step. Once the stain has dried and you're happy with the look of your frame, you're ready to go.
|
Once again, there are many different types of finishing products. Water-based, oil-based, shellacs and varnishes are just a few. But, as we keep it simple and to the point, we'll focus on using gels for now. I mentioned on the finishing supplies page that when it comes to stains and finishes we prefer General Finishes, especially the gels. |
Their Satin Topcoat comes in a Gel while the Semi-Gloss and Gloss come in liquid form.
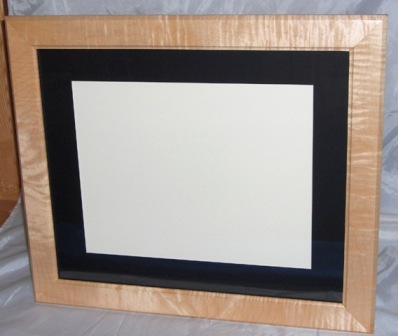
The amazing waterfall affects of this curly maple frame are brought out with the wipe on gel.
Applying the Topcoat
Applying a topcoat is much like applying the stain; start from the inside of the rails and work your way out to the edges and tops, applying a liberal coat on the entire surface
Take a clean cloth or rag and wipe off the excess using a couple of passes to be sure you get it all. Take a close look at the frame when you're done and make sure to "feather out" any rag marks or smudges in the finish.
Don't wipe it down so much that the frame looks dry - it should have a wet, even look to it.
Following the instructions on the can, let the frame dry for the recommended amount of time.
After the first coat is dry take some 0000 steel wool and gently wipe down the frame. This will remove any dust that may have settled in the finish while it was drying.
Be careful not to rub too hard or you'll leave deep scratch marks in the finish.
Wipe down the frame again with the tack cloth and apply 2 to 3 more coats, rubbing the frame down with 0000 steel wool in between each coat.
When you've done that on both sides of the frame you're done with the finishing process. Nice work!
Topcoat Tips
Dust - dust is a known enemy of stains and topcoats. Very sneaky and stealth like! Try to pick an area that is as dust free as possible (even though it's impossible to eliminate it).
For example, if you're working in your basement don't leave drying frames under furnace or air return vents - there is a lot of air movement around them.
If you're working out in your garage, try not to leave the garage door or windows open on a breezy day - you may return to find ragweed, pollen, little bugs and other floating objects dried up in your finish!
Be smart about the environment you leave your frames to dry in. The less movement in and around the area, that may stir up dust, the better.
Got a light? - If so, use it to your advantage. Shining a light across the surface of your frame through the finishing stages will help you detect flaws, smudges and dust particles that you might not catch until you see the gift, you were so proud to give, hanging in your friend's living room.
Both of you pretending not to notice the flaws...
Don't let that happen to you.
We actually have an adjustable lamp mounted to the finishing table to help us see the frame "in a new light". You should too.
Trouble Shooting
No matter how hard you try, sometimes mistakes will happen. You will overlook, what later will seem like, obvious flaws.
It happens to all of us. Don't sweat it, simply go back and fix it.
If you detect trouble during the staining process, for example: you missed some glue during the sanding phase and now the stain won't cover it. Applying more stain isn't going to help.
Make the decision right then to do what you know you should do - even though it means more work: sand the frame back down to raw wood and start again.
If you notice dust particles or the top coat is uneven - 0000 steel wool can save the day. Rub down the whole frame, so it's even, until the flaws disappear.
If the steel wool is not enough, you may have to sand it down again. In the long run it's worth the effort if you want a professional looking frame.
If you would like some more information on how to finish here's a link to very easy to read, keep it simple book that my mother and I really enjoyed.
It's written by Marc Spagnuolo, also known as the Wood Whisperer. You may already know of him. If you do, you already know he's an amazing woodworker. If you don't know of him check out his site after you take a look at this book.
Congratulations on FINISHING your picture frame!!!!
If you're ready for another challenge Mat Cutting is next!

Have a question or a comment? This space is for you! Leave it in the box below.