Miter Joints - Close the Gap!
Perfect miter joints are the most challenging part of making picture frames.
Even though it's the most challenging, if you follow these steps and take your time you'll be able to produce perfect joints every time!
Making thousands of miter joints over the years, I have refined my process over and over until I got to the point of making perfect miters joints every time.
I'm sure there are other methods or approaches that will get the job done, but when you find something that works for you - stick with it.
Below you'll find the Golden Rules according to me - haha - if you have your own method or a suggestion to add - please leave it below in the comment section!
Golden Rules of Perfect Miter Joints
- Golden Rule #1 Your miter saw or the miter gauge on your table saw must be set to EXACTLY 45°
- Golden Rule #2 The opposing rails must be IDENTICAL in length.
- Golden Rule #3 You must use the EXACT same process when cutting miter joints on the rails; don't change the stop blocks, don't change the angle of the miter gauge, don't turn your miter saw to "the other side" to cut the opposing miter, if you can help it.
Ornate molding or rounded molding may mean you have to turn the saw around however.
Don't let the rails move at all during the cutting process.
When I say exact same process I mean exact same process!
Break any of these Golden Rules and you, along with anyone else who sees your picture frame, will know you took the easy way out!!
If you follow these rules you will turn into a Miter Master!
|
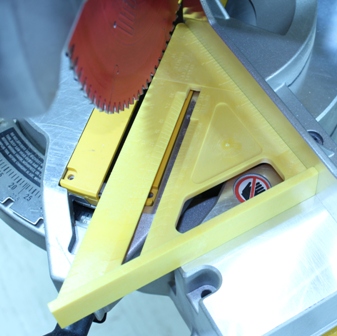
Using a carpenters square will ensure that you have a 45° angle. Lay it up against the teeth of the blade and the fence. It should be flush on both sides. If there's a gap - you're not at 45°. Adjust the saw again and make sure it is exact. Effort now will save you later! We know from the previous process of milling our wood, that the rails are the same thickness and currently the same length. |
Cutting the Miter Joints
Before we set the stop blocks and cut the rails to final length, our first move will be cutting a miter on each end of both of the 36 inch rails.
Clamp your rails in place before making the cuts, this ensures there is absolutely no movement as the rail is being cut.
Make your first cut with the face side of the rail up (the inside of the rail, where your cove is, should always be facing the blade when making your miter cuts).
Make the second cut by simply flipping the rail end over end and cutting the opposite miter.
Repeat these steps on the second rail.
Do not change the process at all!!
Now we're ready to measure and cut the 14 inch rails to final size.
Keep in mind 14" is based on the inside measurement.
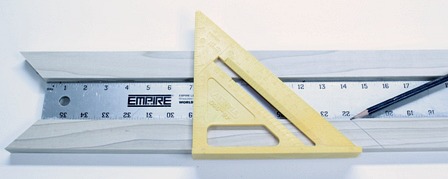
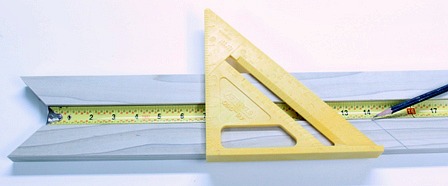
What I like to do is lay two rails face down and lay my yardstick in the rabbets.
Line up the starting edge of the yardstick with the starting edge on the inside of the rail.
It works with most tape measures too!
Then I simply line up my carpenter square on the 14 1/8" mark and make a 45° cut-line.
I always cut slightly oversize, just to give me extra space in case my measurement is off and to give me wiggle room for the glass, mat and backboard.


Take the rail over to your miter saw or table saw, line up your cut-lines with the saw blade and clamp it to the fence.
Now, set your stop block in place, lock it down, and you will be able to repeat that identical length as many times as you need to.
Once you cut your first 14" (+ 1/8") rail, go back and measure again to make sure it is in fact right.
If it is, cut the next rail. If it's not, adjust as needed and re-cut.
If you make a mistake and cut it shorter than 14" use that one for one of your 12 inch rails.
Remember how important it is to measure twice and cut once!
Once you have two matching 14 inch rails lay them down back-to-back and line up one of the edges so they are flush together.
Run your finger over the edge at the other end. If it feels flush you have an identical match.
If you feel a bump, one side is longer than the other. Cut the longer side again (without changing anything in the set up!)
You may not have had one of the rails all the way to stop block.

Repeat this process now for the 12" rails, taking time to ensure that they are also an identical match.
Once you have 2 sets of identical rails, you are ready to do a dry fit.
Doing a dry fit will tell you if you actually do have perfect joints or not.
Set the rail on a flat surface, and "put them together". I even go so far as using a band clamp to pull the rails together, as if I was gluing them up.
Once you do that you will see if the corners meet up perfectly or if there are gaps.
If they do, congratulations! You have a frame with perfect miter joints!
If they don't, re-read the Golden Rules, examine your process and try again.
On to the Step 5 - sanding and prep for assembly...

Have a question or a comment? This space is for you! Leave it in the box below.